
This site has now moved to bobbinsonmymind.co.uk. See this post there.
I think for about 8 months of the year my uniform is generally a moss skirt, tights and boots. I love it. It’s comfy, it goes with basically all my tops, it’s stylish but not too formal, and it uses barely any fabric. What’s NOT to love?! So naturally I had to find a way to continue this habit throughout being pregnant. And here is the solution I’ve come up with! Two different solutions in fact, depending on your preferences!
Making the Moss bump-friendly is a pretty simple adjustment, and if anything it makes the moss easier to sew than usual. But I’d mentioned it in this post, so I thought I’d explain what I done. So here we go!
If you’re not preggers then this is probably of limited interest to you…. unless you fancy an elasticated waist Moss skirt (no joke!). If you would, follow the instructions for the under-the-bump version, but just don’t cut any off the front. Mmmmmmm, comfy!
You will need:
- Fabric for the skirt (slightly less than usual, since we’re not using any for a waistband);
- Fabric for your pocket lining;
For an under-the-bump version:
- Some wide (2 or 3 inches) elastic (it needs to be enough to get round you below your bump);
- Some jersey fabric, as long as the elastic (with the stretch going in that direction) and twice as wide plus 1 inch (so if my elastic is 2″ wide and 1m long – sorry about the mixed units! – then the jersey should be 5″ wide (in the non-stretchy direction) and 1m long.
For an over-the-bump version:
- Some 1/4″ or 1/2″ elastic (enough to go around you above your bump);
- Around 2/3m jersey fabric (preferably with some lycra in)
You won’t need a zip (huzzah!) or any interfacing.
What to do
From the Moss pattern, cut out everything except the waistband, the fly shield and the other fly-shaped piece. Follow steps 1-9 in the pattern. What you have now is the skirt front, sewn together up to where the fly would start, and the skirt back. Now…
I thought long and hard about how to adjust the front pattern pieces and pockets to make the rise lower, and I couldn’t figure it out (the moss pockets don’t quite lie flat against the front, so it’s not as simple as it would seem!), but then I thought of a much simpler way – make the skirt like normal (almost), and just chop some of the front off! So here’s what to do next.
1. Sew the side seams. Finish them too if you like, though you don’t have to do that until the hemming and waistband part. If you’re not sure about fit it might be a good idea to baste the sides first.
2. Work out how much to lower the front rise. To do this, put the skirt on, inside out, and pin the fly part of the front together, up to the point where it feels like it should stop (where your bump starts). Look in a mirror to check that it sits right – if you sew it up too far it will swing forwards, and if you sew it too low it might feel like it’s falling down (or even fall down for real – eeeek!). For me, the best place is around 3″ below the raw edge at the top, where the pin is here:
Now, carefully pin the two fronts together, so that the side seams are matched up, and the pockets are lying flat. I added some to the centre front pattern piece (to make it easier when I put a fly in), which is why mine sticks out – normally the front centre seam would align with the pocket edges, but it doesn’t matter.
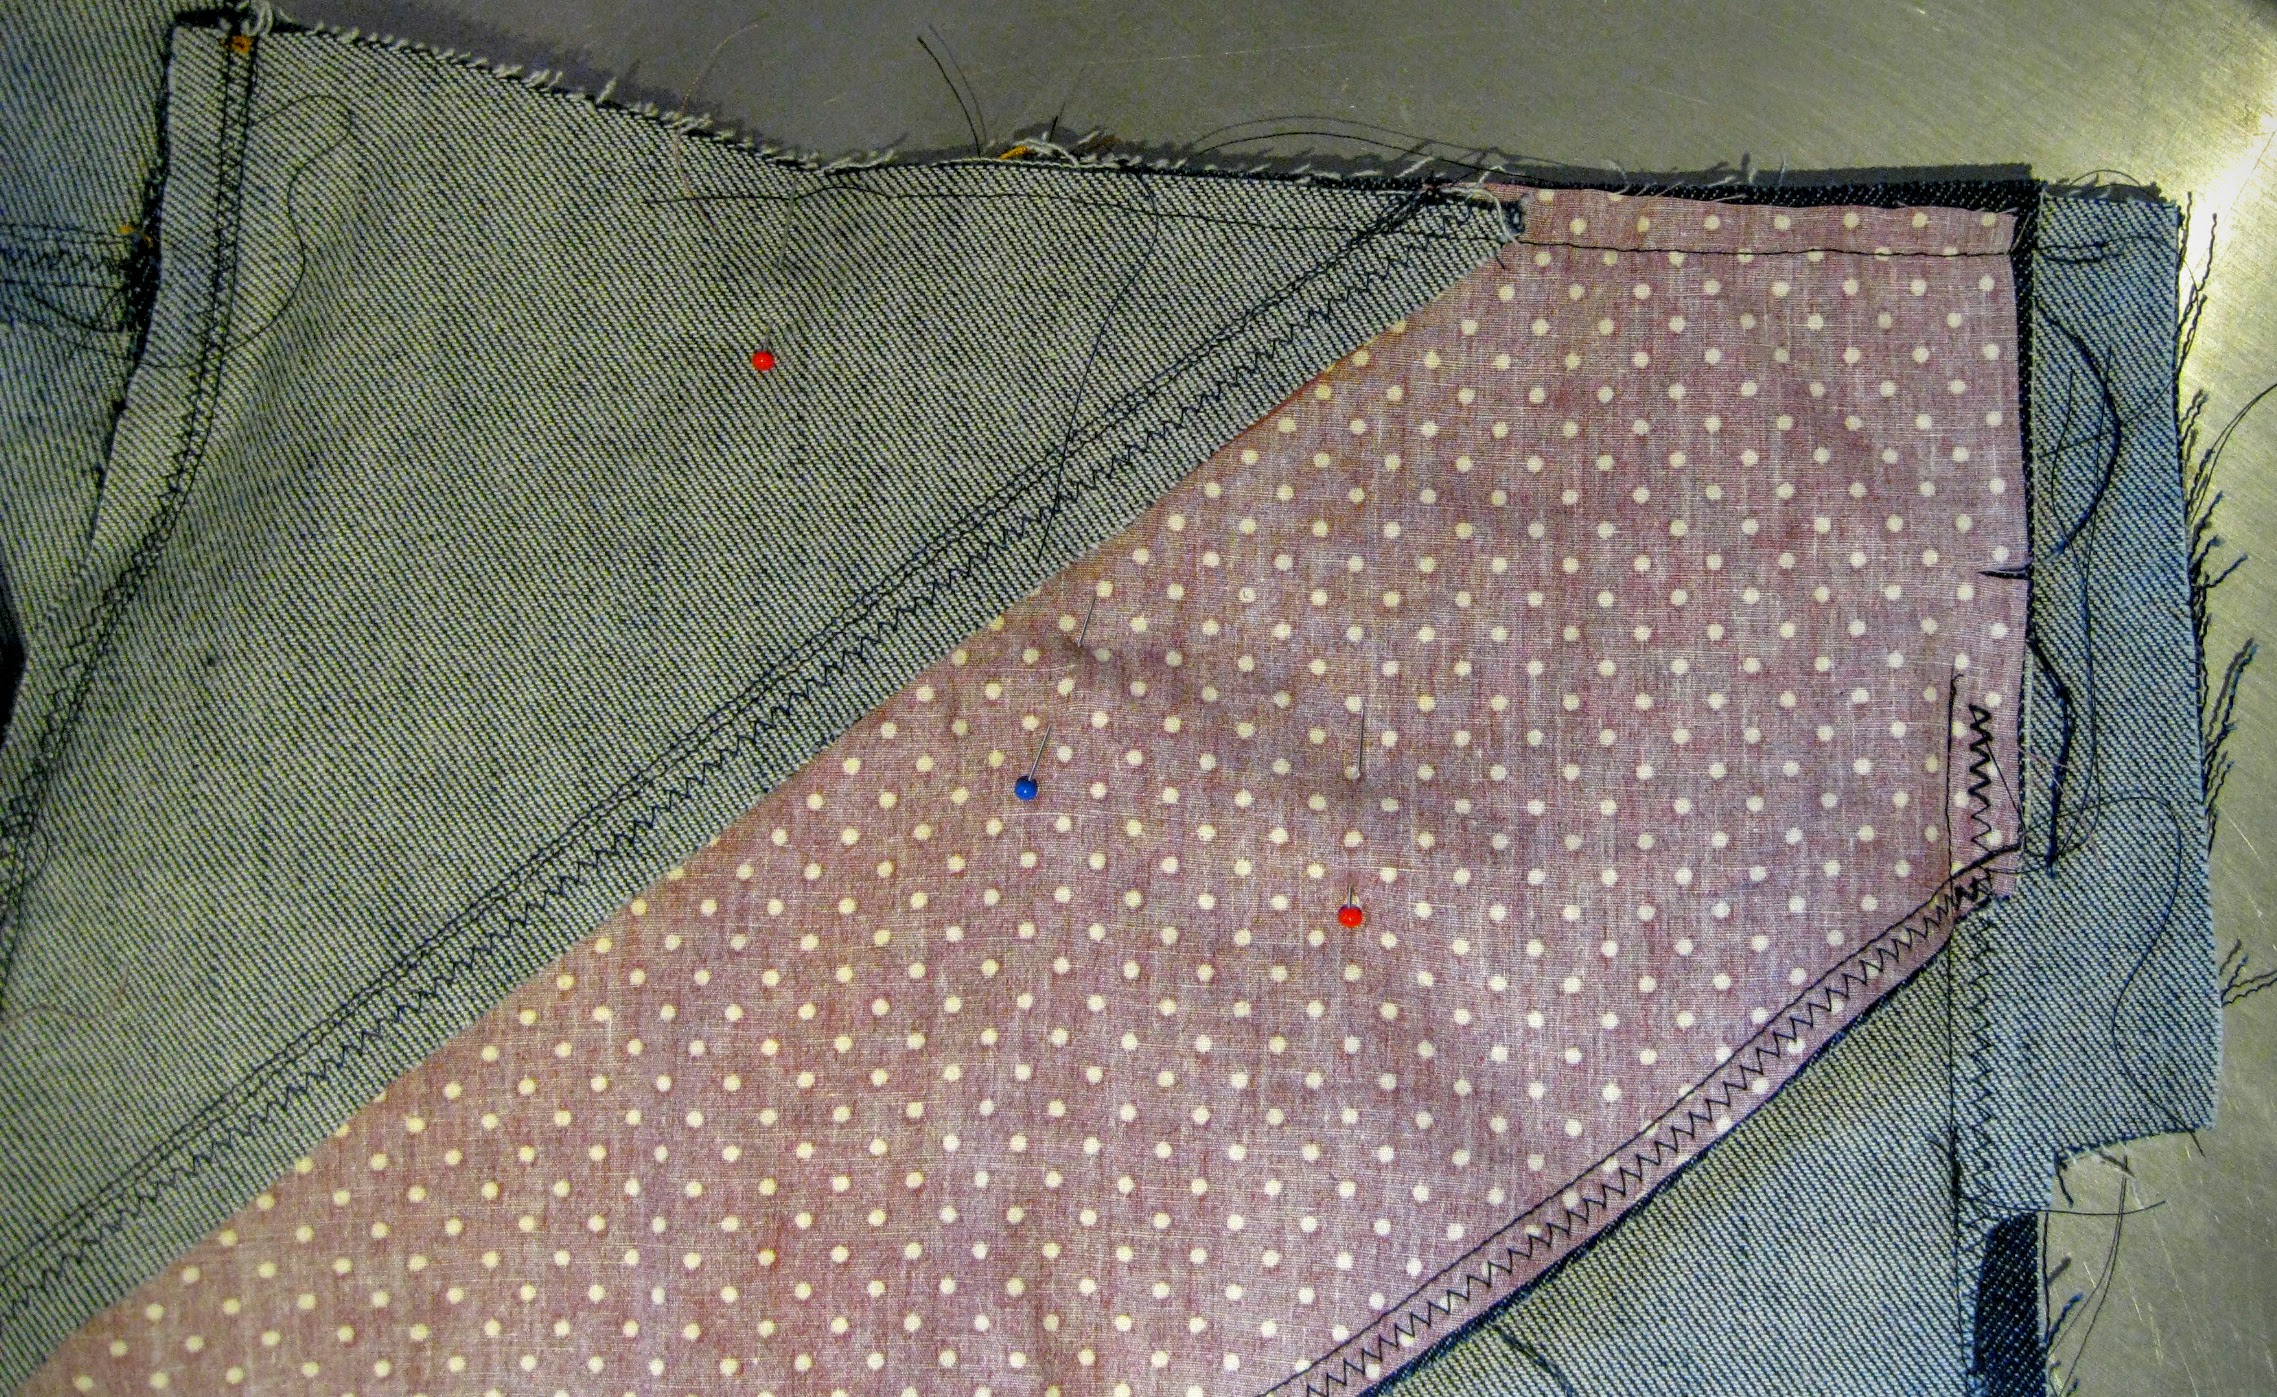
You can see on the right where I’ve stitched up to where the pin was, and finished the seam. Now, carefully draw a smoothed line from the top of that seam to the point on the top edge where the red pin is. This is about 1″ past the start of the pocket.

I’ve gone over my line here (very badly!) so it shows up more clearly. One of my favourite things about the maternity Moss is that the pockets are still accessible, because we aren’t cutting off much of the opening.
3. Remove the surplus front. Now we are going to cut (carefully) along that line, going through all the layers of fabric. Make sure everything is laying flat together, and be careful if you’ve got bulky fabric – cutting through all this denim was a bit of an arm workout in places!
The bits you chop off will look like this

And the skirt will look like this


And now you have a choice to make! You can either attach a band that sits under your bump, or you can make a much larger band that covers the bump.
So!
Under the bump
1. Measure your elastic & jersey
This is maybe the trickiest part. If it’s too loose, your Moss will fall down (and you don’t want to cause a scene!). If it’s too tight, it will be uncomfortable. So pull the elastic around you, below your bump (or where you want the band to sit) until it’s snug, verging on tight. Mine is 35.5″ (after it’s joined up), and the raw edge of my skirt is 41″, so my elastic is 5.5″ shorter. I’ve worn this a few times and it seems right, but when I’m further along I might want it a bit looser. It’s not difficult though to remove the band and put a new one on, so don’t stress too much!
The jersey should be a rectangle that will make a band the same as the elastic. So mine is 36.5″ wide (to give a half inch seam allowance at each side), and tall enough that it goes over the elastic twice, with about a quarter inch to spare. I’m using 2″ elastic, so my jersey band is 4.5″ tall. The stretch goes in the longer direction, so that it will stretch around you.

Sew the elastic into a ring, and sew the shorter edges of the jersey together, right sides together, to make a band.
2. Attach the band to the skirt.
Almost there! Now we need to encase the elastic in the jersey band and pin it to the skirt. Don’t line the seams up, or you’ll have a big bulky area. Pin the raw edges of the jersey to the raw edge of the skirt, right sides together, with the elastic/jersey band on the outside of the skirt, pointing down. I find it easiest to pin somewhere near the back seam, then the front centre, then make some equal intervals.

Sew the band to the skirt. Assuming your skirt is made of something non-stretch, the band won’t be able to stretch wider than the skirt. So pull the band until it’s the same as the bit of skirt you’re sewing it to, and just sew with a straight stitch. You’ll have to pull the elastic tight in front of and behind the presser foot, so this is a bit tricky, so just go slow!

Finally, topstitch along the top of the skirt, with the seam allowances towards the skirt, so that the bulk is reduced (or at least controlled).I use a zigzag, so that the seams are sort of finished too, and it’s less prone to stick out.

And you’re done! Hurrah!


Over the bump
To show you the second method, here’s one I made earlier!

1. Cut out fabric for the belly band
Working out the dimensions of the belly band is a bit tricky. You want it to come comfortably over your bump, so measure how far that is up your side (for me it’s 7″). The centre front is 4″ lower than the sides and back, so there it’s 11″. For width, make the band around 3″ narrower than the width of the skirt (not the length of the raw edge, just the horizontal circuumference). Mine is about 40″, so I made my band 37″. So now we need to work out what sized pieces to cut, with seam allowances. I used half inch seam allowances, but you could do what you liked. We also need an extra inch at the top for the elastic casing.
So! My back piece is 19.5″ x 8.5″ and my front piece is 19.5″ wide, 8.5″ tall at the sides and 12.5″ tall in the middle, with one straight long edge and one curved to mimic the shape of the front skirt.

2. Assemble the belly band and casing
Sew the side seams of the belly band, with right sides facing. One of your raw edges will be straight all round, and this is the top. To make the casing, fold over the top 1″, and sew it down with a stretch stitch (or at least a zigzag – it will need to stretch). Make sure you leave a channel wide enough to get the elastic through. Leave 2″ open so you can put the elastic in.

3. Attach the band to the skirt, and finish.
Put the belly band around the skirt, with right sides together and raw edges aligned. Match up the side seams and pin together. It probably won’t have to stretch much. Sew them together, and topstitch the seam allowances down. I use a zigzag, so that the seams are sort of finished too, and it’s less prone to stick out.


Finally, feed your elastic through the channel and try the skirt on. Pull the elastic until it feels about right, sew the ends together securely, and finish the last bit of elastic casing.
Phew!!!

